
Table of Contents
Screenshots are incredibly useful. Whether you need to capture a moment from a video, save a snippet of an online article, or grab an image for a presentation, knowing how to take a screenshot is an essential skill. For Chromebook users, the process is straightforward but varies slightly depending on the method you choose. In this guide, we’ll explore how to screenshot on Chromebook in various ways, ensuring you can always capture what you need, no matter the situation.
Understanding the Basics
Before diving into the different methods, it’s important to understand some basic Chromebook keyboard shortcuts and features. Chromebooks, unlike Windows or Mac laptops, have their own set of keys and shortcuts, making certain actions unique to these devices. One of these unique features is the “Show windows” key (also known as the Overview key), which plays a crucial role in taking screenshots.
How to Screenshot on Chromebook with Keyboard Shortcuts
Full-Screen Screenshot
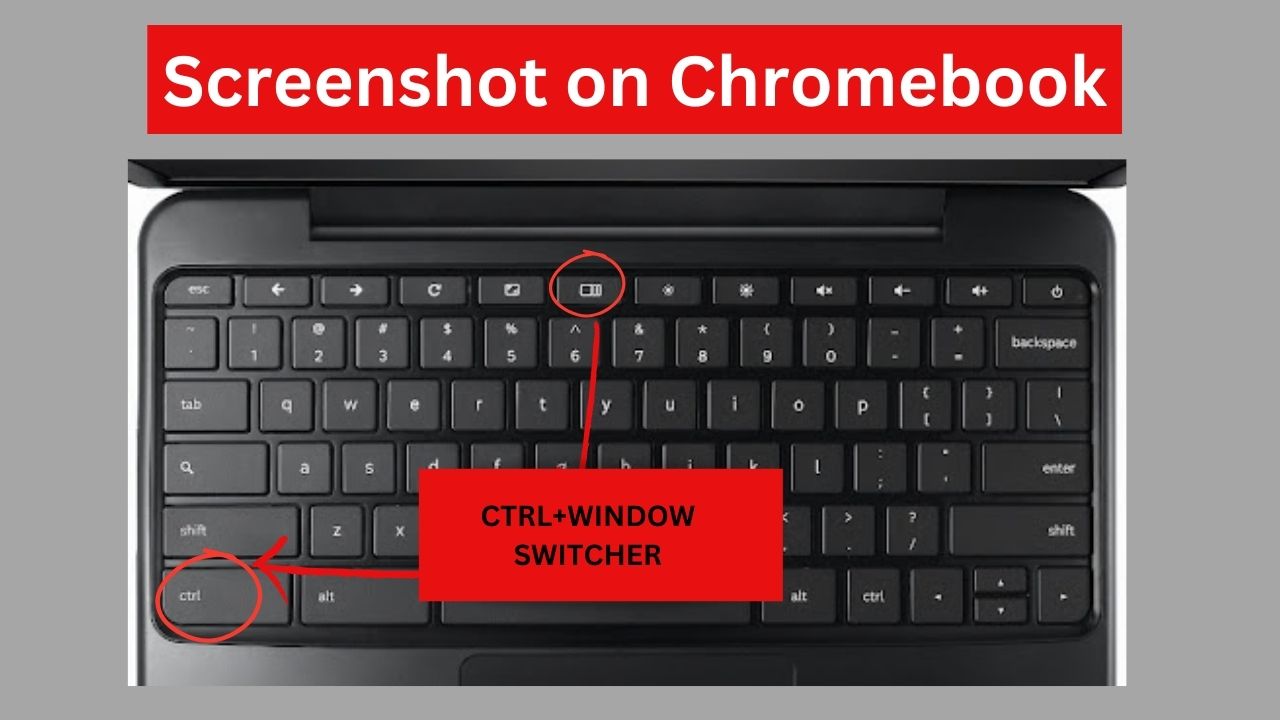
One of the easiest ways to take a screenshot on a Chromebook is by using keyboard shortcuts. Here’s how you can capture the entire screen:
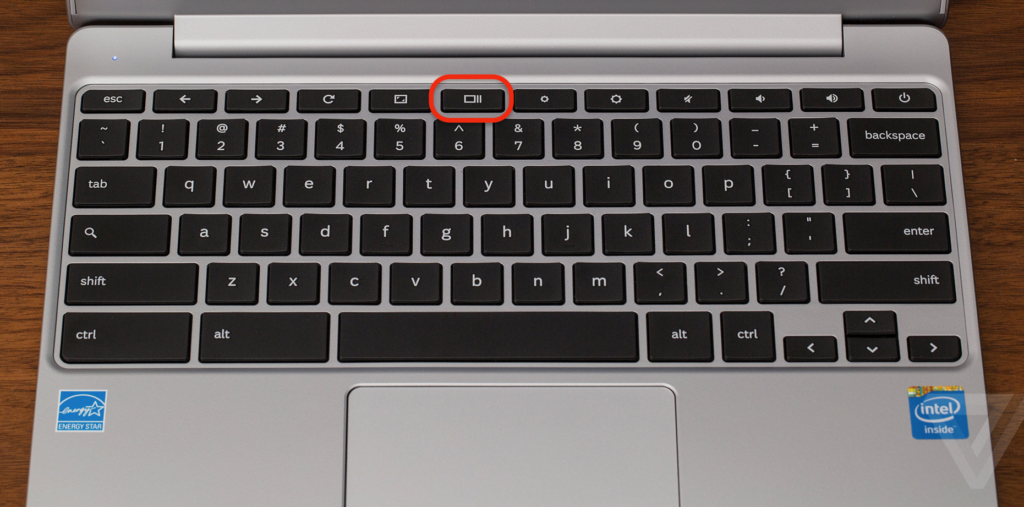
- Locate the “Show windows” key: This key looks like a rectangle with two lines on the right side and is usually located in the top row of the keyboard, near the center.
- Press
Ctrl + Show windows: Hold down theCtrlkey and then press theShow windowskey.
Your screen will briefly flash, indicating that a screenshot has been taken. The screenshot will be automatically saved to your “Downloads” folder.
Partial Screenshot
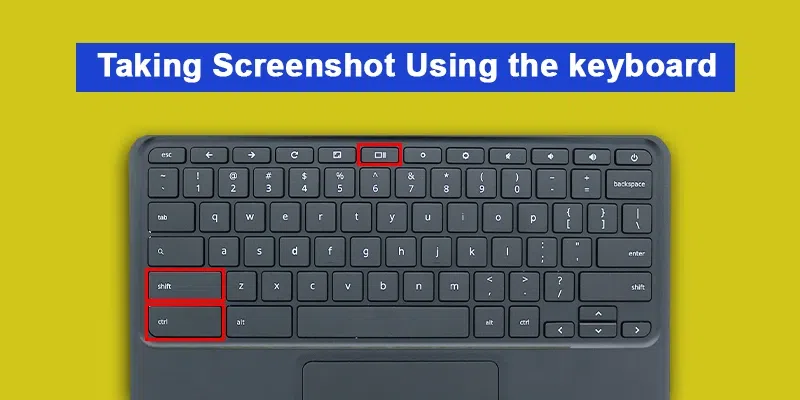
Sometimes, you only need to capture a specific part of your screen. Chromebooks make this easy as well:
- Press
Ctrl + Shift + Show windows: Hold down theCtrlandShiftkeys simultaneously, then press theShow windowskey. - Select the area: Your cursor will change to a crosshair. Click and drag to select the portion of the screen you want to capture.
- Release the mouse button: Once you release the mouse button, the selected area will be captured and saved to your “Downloads” folder.
How to Screenshot on Chromebook Without Windows Key
Not all Chromebooks have the “Show windows” key, especially older models or those with different keyboard layouts. In such cases, you can still take screenshots using other methods.
Using the Power and Volume Down Buttons
For Chromebooks in tablet mode or those without a “Show windows” key, you can use the hardware buttons:
- Press
Power + Volume Down: Simultaneously press and hold the Power button and the Volume Down button.
Your screen will flash, and the screenshot will be captured and saved to your “Downloads” folder.
Using Chrome Extensions
If your Chromebook lacks certain keys or you prefer a more versatile tool, Chrome extensions can be a great alternative. Here’s how to use an extension to take screenshots:
- Open the Chrome Web Store: Go to the Chrome Web Store and search for screenshot extensions like “Lightshot” or “Awesome Screenshot.”
- Install the extension: Click “Add to Chrome” and follow the prompts to install the extension.
- Use the extension: Once installed, click the extension icon in the toolbar and follow the instructions to take a screenshot.
These extensions often provide additional features like annotation and direct sharing, making them powerful tools for capturing and editing screenshots.
How to Take a Screenshot on Chromebook Using the Stylus
If you have a Chromebook that supports a stylus, you can use it to take screenshots as well. Here’s how:
- Open the Stylus menu: Tap the stylus on the screen to open the Stylus menu.
- Select “Capture screen”: Choose “Capture screen” to take a full-screen screenshot or “Capture region” to select a specific area.
- Save the screenshot: The screenshot will be saved to your “Downloads” folder, just like with keyboard shortcuts.
Managing and Editing Screenshots
After capturing your screenshots, you might need to locate, organize, or edit them. Chromebooks offer several built-in tools to help with this.
Finding Your Screenshots
All screenshots taken on a Chromebook are saved in the “Downloads” folder by default. You can access this folder by:
- Opening the Files app: Click the Launcher in the bottom-left corner, then select the Files app.
- Navigating to the “Downloads” folder: In the Files app, click “Downloads” on the left-hand side to see your screenshots.
Editing Your Screenshots
For basic edits, you can use the built-in image editor:
- Open the Files app: Locate your screenshot in the “Downloads” folder.
- Double-click the screenshot: This will open the image in the Gallery app.
- Click the Edit button: Use the tools available to crop, rotate, or adjust the image as needed.
For more advanced editing, consider using a Chrome extension or web-based editor like Pixlr or Canva.
Tips and Tricks for Better Screenshots
Using the Clipboard
If you want to paste your screenshot directly into a document or an email, you can use the clipboard:
- Take the screenshot as usual: Use any of the methods mentioned above.
- Press
Ctrl + V: Open your document or email and pressCtrl + Vto paste the screenshot directly from the clipboard.
Annotating Screenshots
For quick annotations, you can use tools like Google Keep:
- Open Google Keep: Create a new note and click the “Add Image” icon.
- Upload your screenshot: Select your screenshot from the “Downloads” folder.
- Use the drawing tools: Annotate your screenshot with text, drawings, or highlights.
Troubleshooting Common Issues
Screenshots Not Saving
If your screenshots aren’t saving, try the following steps:
- Check your storage: Ensure you have enough space in your “Downloads” folder.
- Restart your Chromebook: Sometimes, a simple restart can resolve the issue.
- Update Chrome OS: Make sure your Chromebook is running the latest version of Chrome OS.
Keyboard Shortcuts Not Working
If keyboard shortcuts aren’t working, ensure that:
- You’re using the correct keys: Double-check that you’re pressing the right combination of keys.
- Your keyboard settings are correct: Go to Settings > Device > Keyboard and ensure your keyboard settings are properly configured.
Conclusion
Taking screenshots on a Chromebook is simple once you know the right steps. Whether you’re using keyboard shortcuts, hardware buttons, a stylus, or extensions, there are multiple ways to capture exactly what you need. With this comprehensive guide, you should now be equipped to take, manage, and edit screenshots on your Chromebook with ease. So go ahead, capture those important moments, and make the most out of your Chromebook’s capabilities!